Posted on Leave a comment

Soft Textured Clutch – Free Pattern

soft textured clutch - free pattern

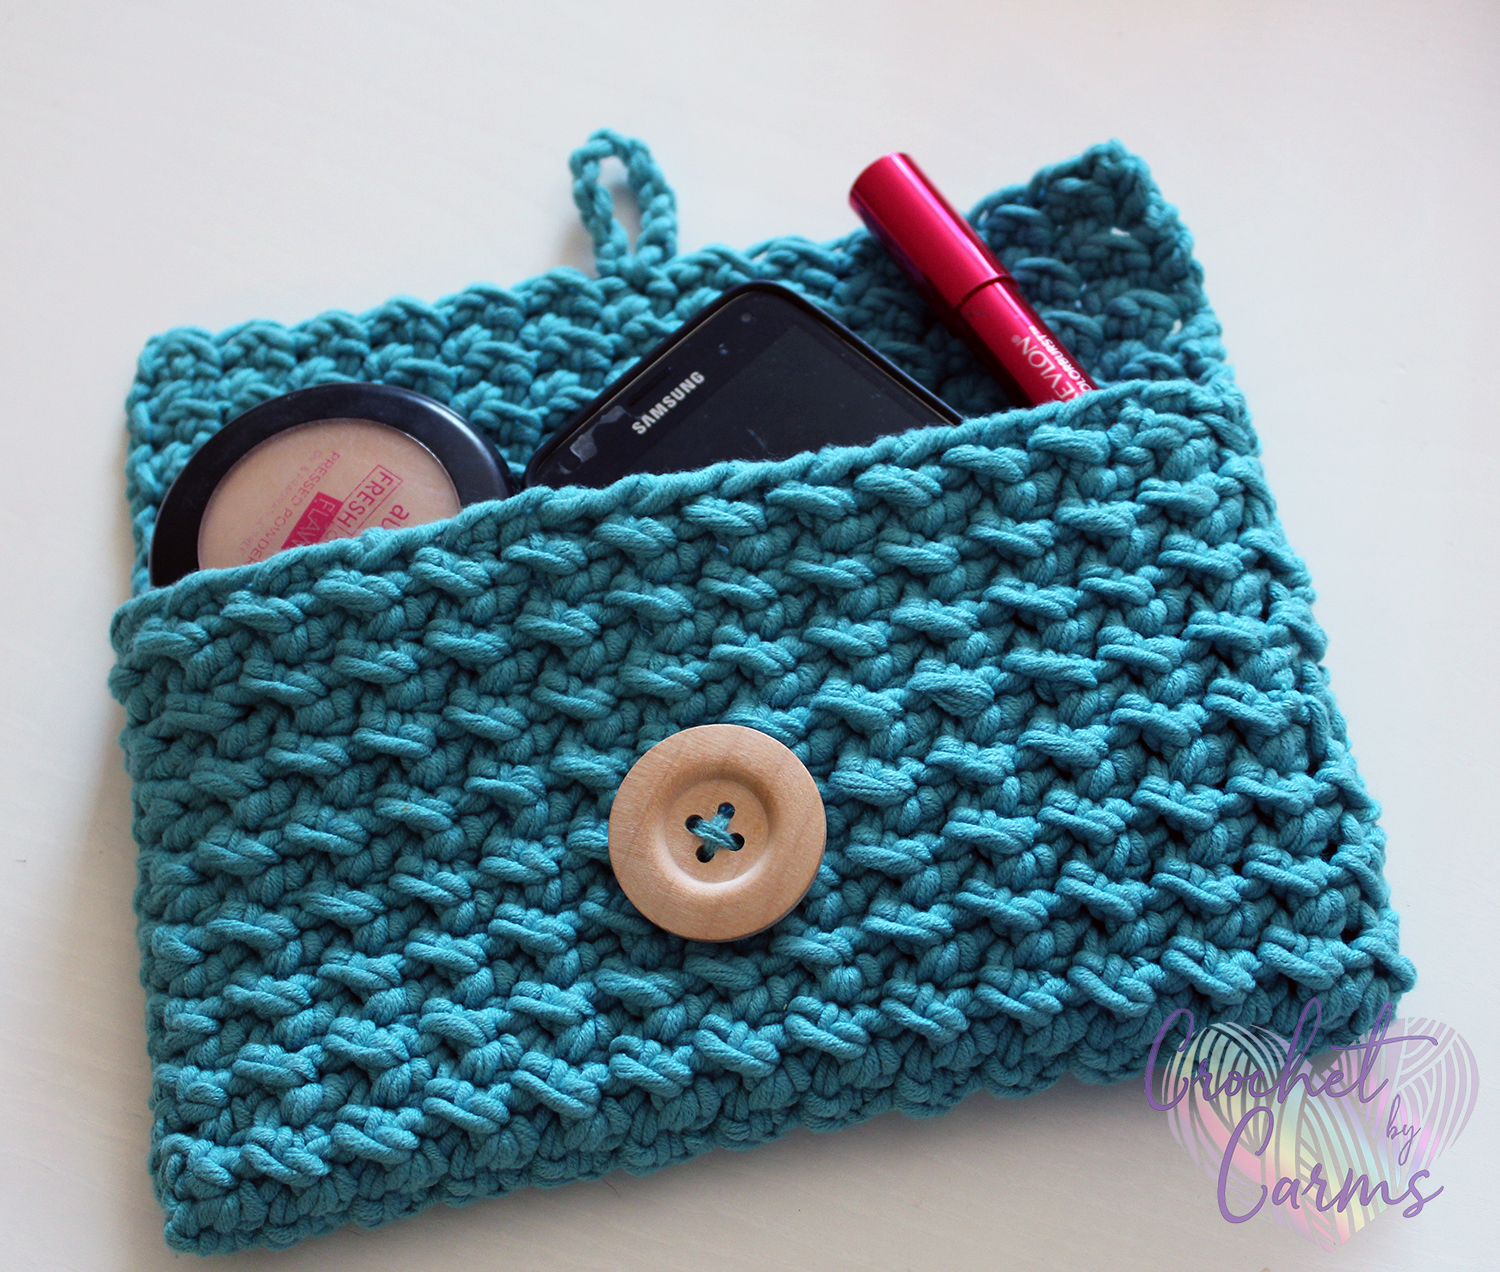
One of the things I love about crochet is the way you can create so many different textures from just a few different stitches. All you have to do is just put them together in different ways.
This lovely soft-textured clutch pattern was inspired by a crochet coach design using the same yarn. I loved its simple structure but wanted something a little bit different. After a day or so of looking at so many different textures and stitch patterns online, I fell in love with this gorgeous wavy pattern that had the misfortune to be named the crunch stitch. The stitch consists of alternating slip stitches and half double crochets and doing the opposite on the way back, so half double goes into slip stitches and vice versa.

This clutch was designed with Moda Vera Elanna yarn in mind, which I think has unfortunately now been discontinued. But I think it would suit a variety of other bulky yarns.
Other yarns that would work as its replacement are Moda Vera Hampton soft chunky cotton blend, Panda soft cotton chunky.
You could even use a thinner t-shirt yarn or ribbon tape.

Soft Textured Clutch Pattern

soft textured clutch - free pattern

Materials

  • 6mm hook
  • Moda Vera Elanna yarn, cotton acrylic mix bulky yarn (100 g, 85m) 2 skeins
  • large-eyed yarn needle – for sewing the bag together and sewing in the ends
  • Smaller needle to sew on the button
  • scissors
  • 4cm (1.5 inch) button
  • Stitch markers or pins
  • measuring tape
  • matching thread

Abbreviations (US)

  • ch – Chain
  • st – stitch
  • sl st – slip stitch
  • hdc – Half double crochet

Finished size

23cm wide x 15 cm tall

Instructions

  • Row 1: Ch 28, Sl st in 2nd ch from hook, *1 hdc in next ch, Sl st in next, repeat from * across, turn (27).
  • Row 2: ch 1, 1 hdc in first st , *1 sl st in next st, 1 hdc in next, repeat from * across, turn (27).
  • Row 3: ch 1, 1 sl st in 1st st, *1 hdc in next st, 1 sl st in next, repeat from * across, turn (27).
  • Rows 4 – 42: Repeat Rows 2 and 3, ending on a row 2
  • Row 43: sl st in 1st st, *1 hdc in next st, 1 sl st in next x6, sl st in the next st, ch 10 and sl st back into the same st. sl st into next st *1 hdc in next st, 1 sl st in next, repeat from * to end of row. Cut your yarn, finish off and sew in the ends.

Construction

  • Laying the piece flat with the loop closure at the top, fold the bottom up approx 13cm for the body of the clutch. Secure the sides together with stitch markers or pins.
  • Using the large-eyed yarn needle, sew each side together using a simple whip stitch.
  • Position the button on the clutch so that it will stay closed using the loop, and sew it on using the smaller needle and your choice of thread. Hint: Instead of thread, if you used a yarn similar to the Elanna, you can separate a few strands from the thread and use that to sew on your button, making it a perfect colour match.
soft textured clutch - free pattern

And that is it! I hope you enjoy making this gorgeous clutch as much as I did.
If you do make it, I would love for you to share your finished products with me. You can find me @crochetbycarms on Facebook and Instagram.

Carms
xoxo

Posted on Leave a comment

Jack-o’-lantern Basket – Free Pattern

Halloween Jack-o'-lantern basket

Halloween and trick-or treating are not as big in Australia as they are in the US and UK, but every year it gets more and more popular. Not everyone takes part, but those who do certainly have lots of fun!

My eldest went trick or treating for the first time last year with a friend and their mum, and this year I think I’ll tag along and take my youngest out too. 

To help with the Halloween celebrations, I have created this spooky Jack o’lantern basket using t-shirt yarn. 

Halloween jack-o'-lantern basket
Halloween Jack-o’-lantern basket

Jack-o’-lantern basket pattern

What you need

  • Tshirt yarn in orange and black or grey (i used a dark grey)
  • 8mm crochet hook
  • Scissors
  • Yarn needle with a large eye
  • Optional, rope for a handle

Stitches used

  • Single Crochet (sc)
  • Slip Stitch (ss)
  • Back Loop Only (BLO)
  • Invisible Join (Check out this great instruction from Mooglyblog if you are not sure how to do the invisible join)

Notes on the yarn

Due to the recycled nature of t-shirt yarn, no 2 yarns are exactly the same and widths can vary quite a lot. The yarn that I used, which came from ministry of yarn, was quite thin for T-shirt yarn. If your yarn is thicker or thinner you will need to adjust your hook size, and this will affect the size of your finished basket.

Instructions

  • Start with a Magic Circle
  • 1: 6 SC in the MC SS to join
  • 2: Ch1 2 sc in each stitch, ss to join (12)
  • 3: Ch1 *1 sc in first stitch 2sc in next stitch*, repeat x5, ss to join, (18)
  • 4: Ch1 *sc in the next 2 stitches, 2sc in the next* repeat x5, ss to join (24)
  • 5: Ch1 *sc in the next 3 stitches, 2sc in the next* repeat x5, ss to join (30)
  • 6: Ch1 *sc in the next 4 stitches, 2sc in the next* repeat x5, ss to join (36)
  • 7: Ch1 sc in the BLO for each stitch around (this help create the base of the basket), ss to join (36)
  • 8: Ch1 *sc in the next 5 stitches, 2sc in the next* repeat x5, ss to join (42)
  • This is the base and the start of the sides, the next row is where we start to add in the face for our Jack o’Lantern.
  • 9-16: Ch1 sc in each stitch around, ss to join (42)
  • 15: Ch1 sc in each stitch around, Cut yarn, leaving about 15cm, then finish with an invisible or needle join. (42)
    • There is no increasing or decreasing in rows 9-17. Just pick up and drop the colours as needed as you follow the chart below. 
Graph for Halloween jack-o'-lantern basket

Notes for changing colours and carrying yarn

My technique when changing colour is:
The stitch before you need the new colour you start the stitch as normal. So insert the hook, and yarn over with your current colour and pull through, then drop that colour and yarn over with the new colour and pull through the stitch. The new colour is now on the hook ready for the first stitch. You then do the same when changing back to the original colour.
Because t-shirt yarn can be quite bulky, my preference for making this basket is to not carry the grey colour all the way around the basket. What I did was drop it when finished with it in that row, and then pick it up in the next.
This will mean having a length of yarn at the back of your work going up the inside of the basket. As long as you don’t pull it too tight when picking it up, it won’t affect the work and you can just crochet over it as you go along the row. The picture below shows the inside of my basket, you can see where the grey was carried up to the next row.

Inside the jack-o'-lantern basket

And there you go, one fabulous jack-o’-lantern basket. Fill it with lollies and chocolate and impress all the kids that come knocking on Halloween. Or you could attach a rope as a handle and use it collect all the yummy treats.

Halloween jack-o'-lantern basket
Halloween Jack-o’-lantern basket

Happy Halloween everyone, and if you make this basket, I would love to see the results! So please post a comment below, or tag me on Instagram @crochetbycarms

Love
Carmen xoxo

Posted on Leave a comment

Simple Ribbed Cowl – Free Pattern

If you are after an easy to make and wear unisex project, the simple ribbed cowl is for you.

This last winter has been a shocker here in Sydney, with some really cold days, and especially cold mornings in which Ben (my other half) has to leave for work early in the morning on his motorbike.

I do not envy him those cold mornings, but I figured I could make him something to help. I have crocheted things for pretty much everyone else in my family, but not my other half, as what do you make the man who has everything?

Ben is a metal head from way back, and his wardrobe consists mostly of old faded black tour shirts, dark denim and more black, so no bright colours was a given. Plus I had to make sure that is was designed so as not to cause him trouble when riding down a dark and windy highway, hence the simple ribbed cowl was born.

The Patons Inca yarn is lovely and soft and so easy to work with, and being a wool blend I knew it would be lovely and warm. The cowl is constructed in joined rounds and I crocheted into the back loops only to give it some texture.

Simple Ribbed Cowl Pattern

Finished Size
63cm x 20 cm

Materials

  • Chunky Yarn – I used 2 balls of Patons Inca (50% Pure new wool, 30% acrylic, 20% alpaca, 50g and 58m) in colour 7019, but any chunky yarn will do.
  • 7mm Hook
  • Scissors
  • Yarn needle

Gauge
Gauge was not super critical for this project, just measure your first row of HDC before joining, if it’s around 63cm long, then you are good to go.

Skills

  • Foundation Half Double Crochet
  • Chain
  • Half Double Crochet
  • Slip Stitch
  • Working in the Back Loop only

Abbreviations Used

  • fhdc – foundation half double crochet
  • ch – Chain
  • hdc – Half Double Crochet
  • ss- Slip Stitch

Pattern Notes
If you are not sure on how to do a foundation HDC, you can find many tutorials on youtube, or you can just start with a ch and HDC into the chain.
Make sure to leave a good long tail of yarn at the beginning to assist in sewing fhdc round together

Instructions

Row 1: fhdc 70 or
chain 72 then hdc into 3rd chain from the hook and all remaining chains (70)
Join with a ss to the first HDC to form a circle, being careful not to twist your work.

Join with ss to first HDC, without twisting the row

Note: all hdc stitches from now on are done in Back Loops only

Rows 2-12: Ch1 (does not count as a stitch) hdc in Back Loop Only of the first stitch and every stitch around, join with ss to 1st hdc (70)

HDC in back loops only


Row 13:
 Ch1 (does not count as a stitch) hdc in Back Loop Only of first stitch and every stitch around, join with ss to 1st hdc (70)

Fasten off

Sew in your ends, and your simple ribbed cowl is complete.


After i finished the first one, i decided to experiment with different yarns and made the cowl in Moda Vera Fayette, which is a colour changing yarn. It is not a chunky yarn, more of a variable 8ply, but I still used the 7mm hook to make it nice and drapey. I love how this one turned out too.

I hope you love making this as much as I did, and please share your pictures if you do, would love to see them!

Love

Carmen

xoxo

Posted on Leave a comment

Crochet Easter Bunny Applique Pattern

With my love of making t-shirt yarn baskets, I knew I wanted to make Easter baskets this year. So along with some pretty pastel yarn to make them with, I searched for something else to add to them, and while trying to make something else entirely ( a flower I think), came up with this cute little crochet Easter bunny applique.

Crochet Easter Bunny Applique Pattern

These little bunnies would look good on baskets, as bunting, using smaller yarn would look so cute on Easter cards, Easter bonnets and even paper Easter baskets.

If you would like to make your own crochet easter bunny applique please find the pattern below.

Crochet Easter Bunny Applique pattern

What you need
t-shirt yarn
7mm crochet hook
yarn needle
scissors

Stitches
Magic Circle
Chain (Ch)
Single Crochet (SC)
Double Crochet (DC)
Slip Stitch (SlSt)

Bunny’s Body

Start with a magic circle

Round 1: 6 sc into the ring, pull tight and join to first sc with a SlSt

6 sc in a magic circle - crochet easter bunny applique
6 sc in a magic circle – crochet easter bunny applique

Round 2: Ch 1 (doesn’t count as a stitch), 2sc in each stitch (12) join with SlSt to first sc make sure to skip the ch 1 at the beginning of the round.

Easter Bunny Applique - Round 2
Easter Bunny Applique – Round 2

Bunny’s Head

3DC into the same stitch

Round 3: Ch 2, 3 dc into the same stitch

Bunny’s Ears

Round 4: Ch 3
Round 4: Ch 3

Round 4: Ch 3

Round 5: 1sc each in the 2nd and 3rd chains from the hook

Round 5: 1sc each in the 2nd and 3rd chains from the hook

SlSt into the side of the top of that 3rd dc then slip stitch into the bottom side of the same DC

SlSt into the side of the top of that 3rd dc then slip stitch into the bottom side of the same DC

Slip stitch into the next 2 sc of the circle (the ch and 3DC of the head were in the first stitch)
Cut yarn and pull through

Slip stitch into the next 2 sc of the circle

Then put your hook from back to front through the next stitch and pull the yarn end through to bring it to the back.

Lastly, sew in your ends and you have 1 bunny.

For added effect, glue on a little pompom for the tail, and you could even give him eyes and whiskers with black thread, or even googly or safety eyes.

I hope this made sense and I hope you have fun making him,  now hop to it!

Sorry, couldn’t help the bunny pun. Oh and here is a bunny I made using acrylic DK and a 3.5mm hook, just to show you that it will work with pretty much any yarn you want to use and the appropriate hook to go with it.

If you post any of your bunny’s on social media, please tag me @crochetbycarms, and they will be added to my bunny army.

Notes: In case you hadn’t noticed, yes I am a left-hander and so all my photos will reflect this. If you have any issues with my photos making things harder for you (I know how confusing trying to make sense of things going the wrong way is), please leave me a comment or send me a message and ill flip the photos around just for you.

Love

Carmen